RubyInstaller
Main version of Ruby we'll be using in this book is 2.2.1, so that's the first version we will install. Go to download section of RubyInstaller site and download Ruby 2.2.1-p85 installer. Double click on the downloaded executable file (rubyinstaller-2.2.1.exe) and follow instructions on the screen. However there are few things you must pay attention to.
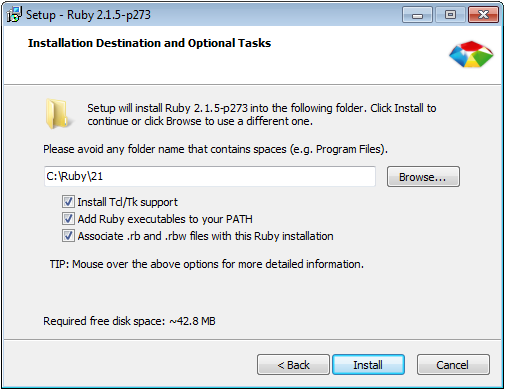
It is recommended to install Ruby on the path without spaces. By default installer offers you to install Ruby to C:\Ruby22. You can change this path to suite your needs but be aware of the fact that MinGW tools, needed for instaling some types of gems (which we will cover later), do not handle paths with spaces well so you might face various problems if you install Ruby to standard Windows location C:\Program Files. We will install it in C:\Ruby\22 since we will keep all versions in the same root directory.
Next important thing is to add Ruby executables to the path. This way you will be able to use Ruby in every Command Prompt without need to alter system path every time. However it is not essential at this moment since, during this tutorial, we will handle this in a different way.
In addition you can associate .rb and .rbw files with this Ruby installation which will give you a possibility to execute Ruby scripts just by double-clicking Ruby files. This step can be skipped if you do not want to start Ruby scripts from GUI. Figure 2-1 shows installer's page with these options.

When installation is complete open up new Command Prompt or ConEmu window and check that everything is installed correctly:
C:\>ruby -v
ruby 2.2.1p85 (2015-02-26 revision 49769) [i386-mingw32]
C:\>
Let's stop here for the moment and check what installer has actually done. Lot of experienced developers agree that good way to learn programming is to explore other's code. This is not related only to programming and we will use same approach here.
Apart from the fact that installer has put all Ruby files in the selected directory, C:\Ruby\22 in our case it added this path to system path and that's why we are able to start ruby in new command prompt. Besides it created few shortcuts in the start menu. You can find them under Ruby2.2.1-p85 sub-menu item.
First shortcut has a title “Interactive Ruby”. Click on it. New Command Prompt opens with Interactive Ruby (irb) already started. This program is actually Ruby interpreter which you can use to experiment with your code in real-time. Each statement is immediately executed and you can see its results. This is excellent tool if you started to learn Ruby. Click again on Start Menu and on Ruby2.2.1-p85 sub-menu. Right-click on Interactive Ruby and Properties in the context menu. Look at the text box next to Target label on Shortcut tab. This is command used to start irb. We will use it in ConEmu. Open ConEmu Setup tasks dialog by clicking on drop-down icon beside green icon with plus sign in the upper right corner. Click on button with plus sign to add new task type to ConEmu and in the text box type same command as you have in the Properties dialog box for irb shortcut. In our case it is:
C:\Ruby\22\bin\irb.batIn the Title text box type irb22. If you want to exit irb session just type quit and pres Return button on your keyboard. Not that if you didn't check “Add Ruby executables to your PATH”, irb tab just created in ConEmu will still work.
Let's create one more tab in ConEmu in which you can use Ruby even if it is not on you path. Go again to setup tasks dialo and add a new task. In the shell text box type: C:\Windows\System32\cmd.exe /E:ON /K c:\Ruby\22\bin\setrbvars.bat and type Ruby 2.2.1 Console for the title. If you now activate new ConEmu task command prompt with installed ruby activated in the command prompt.
ruby 2.2.1p85 (2015-02-26 revision 49769) [i386-mingw32]
c:\>
Finally if you have checked “Associate .rb and .rbw files with this Ruby installation” during installation installer has made changes to your PATHEXT system variable. This variable contains list of file extensions and it tells Windows what is it supposed to do with files who's extension match one of the listed values. Basically this is list of executable files and the most common extensions are .EXE, .BAT and .CMD.
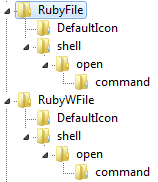
Installer has added two more, .RB and .RBW. New file types are defined in the Windows registry. In order to completely understand this association open Registry Editor by clicking on Start button and typing regedit and pressing Enter. Expand Computer and HKEY_CLASSES_ROOT node in the left tree control and scroll down to the .rb and .rbw nodes. Clicking on them will display values stored for these nodes, RubyFile and RubyWFile respectively. Now scroll down till you find keys named RubyFile and RubyWFile expand all nodes. You should end up with the tree that looks like shown in Figure 2-3.

Each key has several sub-keys. The first one, DefaultIcon, tells Windows Explorer which icon to display for Ruby files. Next value is stored in the shell\open\command key and it tells Windows what to do with these Ruby files. Values are: "c:\Ruby\22\bin\ruby.exe" "%1" %* for RubyFile (extension .RB) and "c:\Ruby\22\bin\rubyw.exe" "%1" %* for RubyWFile (extension .RBW) and they tell Windows to invoke Ruby interpreter and pass it file name (argument “%1”) and other arguments (%*).
Notice that these values use different Ruby executables. The first one, ruby.exe, is “standard” Ruby interpreter which is meant to be used in Command Prompt. Each time it is invoked new Command Prompt window will be opened and Ruby script will be executed in it. But if you want to call Ruby from another process or you want to execute Ruby script as a background task rubyw.exe is more appropriate. It is exactly the same Ruby interpreter except it doesn't provide standard in, out and error streams. Besides it doesn't launch new Command Prompt when executed.
Let us test our new file association. Create new directory where we will keep our Ruby sources in C:\projects. Within that directory create subdirectory called misc and edit new file called ruby_args.rb with following code:
if ARGV.empty?
  puts "No arguments supplied"
else
  ARGV.each_with_index do |arg, idx|
    puts "Argument #{idx} is: #{arg}"
  end
end
Double click this file in Windows Explorer. New Command Prompt window will open, “No arguments supplied” will be printed out and window will close. Change extension to .rbw and double click again. Have you seen the difference? No window was opened even though script was executed. Change extension back to .rb. This feature is similar to the so called shebang line on Unix-like systems which tells system how to execute script.
Open up new Command Prompt window, go to c:\projects\misc directory, type name of our script with extension and hit Enter. Result should be:
c:\>cd projects\misc
c:\projects\misc>ruby_args.rb
No arguments supplied
Now execute script but provide some arguments to it:
c:\projects\misc>ruby_args.rb arg1 arg2 arg3
Argument 0 is: arg1
Argument 1 is: arg2
Argument 2 is: arg3
You see that, with these file associations, there is no need to explicitly use ruby interpreter. Operating system will do that for us. Nevertheless you can still use it by giving full path to ruby.exe if you haven't added it to the path or by using ruby.exe or just ruby if it is in your path. All three versions are displayed below.
c:\projects\misc>c:\Ruby\22\bin\ruby.exe ruby_args.rb one two
Argument 0 is: one
Argument 1 is: two

c:\projects\misc>ruby.exe ruby_args.rb one two
Argument 0 is: one
Argument 1 is: two

c:\projects\misc>ruby ruby_args.rb one two
Argument 0 is: one
Argument 1 is: two